Skip to content

Grass Protection Mesh

$597.18


FREE SHIPPING
SKU EG-GPM-HG-6.7X25

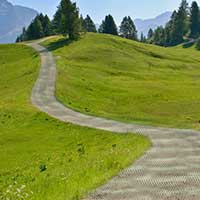
MudStop™ Grass Protection Mesh (also known as "lawn protection netting") is a heavy grade mesh used to protect grass from vehicular and pedestrian traffic. This mesh is manufactured from HDPE plastic and helps distribute the vehicle's weight over a wider area, which helps to prevent rutting, sinking, and grass root damage. The mesh is UV resistant and flexible allowing the material to conform to the grass area.

The grass protection mesh is ideal for installations in parking areas that experience daily and/or frequent traffic. Typical applications include commercial parking areas, residential parking, RV parking, public pedestrian pathways, and more. This product can also be used for dog runs as the mesh openings are small enough to keep even smaller dog paws from slipping through. This product is made in America.

***For use on flat surfaces only***

Size: 6.7' x 25' (167.5 SF)
Roll Weight: 60 lbs

MudStop HG™
At a Glance

  • Manufactured in the USA
  • Built-In UV Stabilization
  • Promotes Healthy Grass Growth
  • Reduces Mud
  • Quick Installation
  • Made with Recyclable Materials

MudStop™ HG
Heavy-Grade Grass Protection Mesh

Download Product Specification Sheet
  • Roll Size: 6.7' x 25'
  • Square Feet Per Roll: 167.5
  • Roll Weight: 60 lbs

HG

Heavy-Grade

Our grass protection mesh is designed for demanding applications. The osculated mesh pattern provides a high degree of strength which is required to support the weight of a vehicle. Our mesh is ASTM lab tested to ensure strength and durability.

Request Formal Quote

Do you require a formal quote for MudStop™ HG? Fill out the form at the link below and we will provide you with a written quote within two business days.

Request Formal Quote

Questions?

Do you have product related or purchasing questions? We are happy to help, feel free to contact us.

Ground Staples

Each Roll of MudStop™ HG requires 100 ground staples for proper installation. (sold separately)

Ground Staples - 100 Staple Carton

MudStop™ HG Calculator

How many rolls of MudStop™ HG do you need for your project? Just enter your square footage below:

Easy to Work With 25-foot Roll Size

Most heavy-duty grass protection mesh on the market is shipped in large 50’-70’ rolls which are very large, heavy and difficult to handle. When developing MudStop™ HG we kept this in mind and decided to produce 25’ rolls which are much easier to handle and work with. A roll of MudStop™ HG weighs 60 lbs and can be picked up and moved by one person instead of two. Additionally, due to the reduced roll length, smaller projects can be accomplished without having to purchase a bunch of extra material.

MudStop-roll.jpg__PID:d2eae9a3-ca81-4b0e-96cc-c560816fd8c4
Mudstop-roll-2.jpg__PID:d8c4898c-ebf9-49dc-9a03-afd1179e79b0

MudStop™ HG vs Economy-Grade Mesh

Low priced economy-grade mesh can provide basic reinforcement for very occasional vehicular parking. Where issues arise are in material durability and reduced traction. Due to its low strength, economy-grade mesh quickly deforms when driven on and will begin to rut out the grass underneath. Additionally, the low priced mesh is typically a flat mesh without ridges. This can create a slippery surface for pedestrians and vehicles when wet. MudStop™ HG incorporates an osculated mesh pattern to provide greatly enhanced material strength while its multi-layer design enables enhanced traction for both vehicles and pedestrians.

Where Can MudStop™ HG be Installed?

MudStop™ HG grass protection mesh can be installed in a wide variety of different landscape applications - pretty much anywhere you want protection against rutting from tires or foot traffic!

Residential Parking Areas

GPM-1.jpg__PID:bbf8b96c-3c1b-4431-a964-bc47325a9466

Commercial Parking Areas

T5.jpg__PID:3081d8ac-8348-437d-af47-be99e34e1a5b

Vehicle Access Roads

T4.jpg__PID:2818c798-5489-467e-b6c0-ec77b7e1bd9e

Golf Cart & ATV Pathways

T3.jpg__PID:bd9eefc5-91d0-4718-b5fc-064df26f0e70

RV, Trailer or Boat Storage Lanes

T6.jpg__PID:0e701d9f-4b66-46b9-a15d-9528e8622e1e

Overflow Event Parking

T1.jpg__PID:2e1ebe5a-7c61-46c7-8d98-aa7db8505c65

Pedestrian Walkway Areas

T2.jpg__PID:5c65ac6a-dab9-438b-902c-fc159d8bec82
dog-running-on-grass-protection-mesh.jpg__PID:fb43ede6-318c-45eb-860e-708b72a256f8
dog-paws-turf-reinforcement-mesh.jpg__PID:9249befa-2ea2-4d87-80e5-a5ced6e4fb43
dog-grass-protection-mesh.jpg__PID:8f0ae220-49e3-428f-987a-ee58dab8bfca

Great for Dog Runs Too!

In addition to protecting grass from vehicular damage, MudStop™ HG can also be used to protect grass from becoming damaged in dog run areas. The osculated mesh pattern is engineered with small openings which keeps paws from getting stuck. Does your dog love to dig in your lawn? Our mesh will prevent that from happening as well. MudStop™ HG is the perfect solution to keep your lawn mud free and your dog with a safe place to run and play.

3-Step Easy-Installation

The installation of MudStop™ HG in a lawn area can easily be accomplished by the homeowner. Follow the simple 3-step process below to reinforce your lawn with MudStop™ HG for optimal protection of your lawn area:

Step 1:
Cut the Grass Short:

GPM-Step-0.jpg__PID:c001bd93-e694-4775-bc7a-11dbf3fba43d

First cut the grass area short so that the mesh can be applied as close to the root zone as possible. 

Step 2:
Roll out the Mesh:

GPM-Step-1.jpg__PID:a43dd856-61f3-4a1c-8833-35917fd2e62c

Roll out the mesh on the grass’s surface. 

Step 3:
Attach Using Ground Staples:

GPM-Step-2.jpg__PID:e62c99d2-948e-4d8d-b35a-2a68b9d6008a

Using 8" ground staples, affix the mesh to the ground’s surface placing 1 staple every 18 inches in all directions. (each 25' roll of MudStop™ HG requires approximately 100 staples) As a general rule of thumb, the more staples you use the more secure the mesh will be. Edges and seams may require additional staples depending on the installation site characteristics. While stapling, be sure to smooth out any bumps or bubbles in the mesh caused by an uneven grass surface.

You're Done,
Park Your Vehicle!

parked-MudStop-2.jpg__PID:e4972e7b-81aa-4909-bc70-ab4a4d0445b2

You can now drive, park and walk on your reinforced lawn. Be sure to water the grass well to encourage appropriate grass growth through the mesh. This will help disguise the material and provide a more natural looking surface.

Parking an RV or Boat?

If you are parking an rv, boat or other heavy vehicle long-term on the mesh it is a good idea to double up the mesh where the wheels will directly rest. Over time a very heavy load concentrated on a single area can deform the mesh especially during heavy rainfall if the ground below becomes saturated. Adding a second layer of mesh will provide additional support and help to prevent indentation into your lawn from the vehicle tires.The best way to accomplish this is to install a 1-1/2’ square under the main mesh layer where each tire will rest.

How Long Will Shipping Take?

MudStop™ HG is stocked and ships from our Kansas City distribution center. Orders typically ship within one business day. Shipping is free and most customers experience delivery within one week of order placement.

Transit Time

MudStop™ HG orders typically ship within one business day of order placement. Smaller orders of a couple rolls typically ship via UPS / Fedex while larger orders ship by LTL freight. If your order ship via LTL freight the delivery company will contact you prior to delivery to arrange a delivery window that works with your schedule.

shipping-map-c.gif__PID:a1d7b040-17b5-4225-ad55-d824eb952374

Transit times on the map above are shown in business days and exclude weekends and holidays.

How To Lay Down Sod For A Beautiful Lawn

Laying down sod is probably your best bet if you don't want to wait months on end to get a beautiful lawn. In this article, we will give you everything you need to know for laying sod and how to care for your beautiful new lawn.

Laying sod is a great way to achieve a beautiful lawn without the incredible wait time involved for seeds to germinate and grow. That does not mean it will be a cakewalk, it's still going to take good planning, preparation, and good installation to form a really solid foundation for an incredible lawn for years to come. If you care for and treat your lawn right, it will pay off in the long run.

Everything comes down to knowing how to lay down sod and how to go about it the right way.

Aerial View of Laying Out Sod

Aerial View of New Lawn Install

The Planning Stage

The planning stage is critical if you want the very best results. First off, you need to know the best time to lay down sod in your area. Fall is the best time to plant the sod because if you do it in the warmer season, there is a good chance it will lead to burnout. It's recommended during the fall in the north or early spring in the south. Don't plant sod later than one month before the first fall frost because the grass needs time to establish roots before the colder weather marches in.

If you have a large lawn, you might want to break it up into smaller projects. You should start by hitting the worst or most visible areas first then save other areas for next year.

It's really important your preparations are completed before the delivery of the sod. Sod can go bad quickly if it dries out or heats up so have the pallets delivered to an area that is shady.

If you can't get to it right away, if the sod is rolled, unroll it and keep it moist.

If you are ready to get started, the first step will be removing the old lawn.

Step 1 -You can rent out mechanical equipment or hire someone to remove it for you. For smaller lawns, use a grape grubbing hoe which will work really well for removing the turf. For larger lawns, rent out a sod cutter. It will slice under the grass so you can pull up sections of turf. Please Note, if you cut the sod while the lawn is moist, it will be easier. Make sure you pull up all the old turf. Don't leave anything behind.

Address Grading Issues

Step 2 -Before moving forward, if you have any grading issues, you should correct them first. In many cases, you will have to bring in a landscape contractor with heavy equipment, but if it's minor problems, you can correct them yourself.

Rolls of Sod on Pallet

Pallet of Sod

When examining the grade problem, make sure the slope faces away from your home in every direction. The slope should drop, at the least, every 2 to 3 inches every 10 feet. When you are done with the grading, it should be the same level in your lawn as certain features such as a sidewalk or a ground-level patio.

To correct the grade you can use a rototiller to make the process much easier. Correct the level of the subsoil by removing high grades and placing fill in lower areas.

Spread 2 inches of topsoil over the subsoil then till the soil so it's nicely blended. This will help to prevent drainage problems between both layers of soil. This should be followed by at least 4 inches of the topsoil placed over the soil. Add loam that is clear of any debris, including roots, weed seeds, pesticides, and stones. If you will be doing this yourself, use a landscape rake and work the topsoil to the proper grade.

Installing Rolls of Sod

Sod Installation

Step 3 - It's time to test and correct any soil issues. You can add organic materials such as lime or sulfur-based nutrients. Any recommendations will depend on the pH levels, the nutrients in your soil, and the type of soil.

You should run a soil test but if you prefer not to, the standard for each 1.000 square feet of new lawn should be 2 lbs of basic phosphorus and potassium, 50 to 100 lbs of lime in areas with acidic soil, and 3 to 6 cubic yards of material such as peat moss or compost.

You can be sure you have an equal amount of material by dividing it in half. Take half and distribute it while walking in one direction and the other half while walking crisscross. When you are done, till the material into the top 6 inches of the soil. Smoothly, rake the soil then tamp it down using a roller.

Step 4 – It's time to prepare the lawn for sod by raking the area that will be replanted until it's smooth. Be sure to remove any debris such as stones or vegetation that has risen to the surface from tilling. Once you are pleased with the outcome, water the ground and check for puddles. Keep in mind, puddles form where there are depressions. After the soil has dried, take soil from higher areas and fill in the depressions.

Take a lawn roller to the prepared soil to create a firm base for the sod. Fill the roller approximately 1/3 full of water and roll the soil until your footprints are not more than 1/2 inch deep.

Finish the preparations by thoroughly watering the area 2 days before planting.

Step 5 – It's time to lay the soil. Apply a starter fertilizer high in phosphorus at a ratio of around 2:1:1 or 1:1:1. Lightly water the area where you want to start.

Lay the sod over one section of lawn at a time. Place the first row along a straight line like along a fence or the patio.

Also, a straight line will reduce the amount of cutting you will need to do. You can use a sharp-bladed knife or a cutting tool, whichever you prefer. Be sure the last row is a full strip even if that means making the row before narrower. When it comes to contoured borders, overlap them with sod and trim the excess where needed later on. Reminder, try and install the sod the same day it's delivered. Should you have any sod left over, unroll it in a shady place, lightly water it, and use it the next day.

In some areas of the country and with various kinds of grass, the sod will be delivered in pallets of rectangular pieces instead of rolls. If the sod is in the form of brick, lay it out on your lawn as if you were building a wall. The pattern will help with drainage and help the sod fill in better or more completely.

On the other hand, if you are installing the sod on a slope, start laying the sod at the lowest point. You want to stake each piece in three places to prevent any slippage. The stakes should be spaced equally and set in from the sod strip's edges by at least 6 to 8 inches.

Rolling Out Grass Sod

Grass Sod Being Rolled Out

After you have laid the sod, firm it down using a roller that is 1/3 full. If the roller is too heavy, it can lead to the sod slipping. In hot weather, water the sod lightly before rolling, it will keep it from slipping. After rolling, immediately soak to a soil depth of 6 to 8 inches.

Step 6 - Over the first month or so, show a lot of care with the lawn. You must be patient as the sod will take time to grow and root into the ground. Once the sod is laid, show as much caution as possible in order to prevent it from being damaged.

Reduce any activities or foot traffic for at least 3 weeks. Plan on the need for continual watering before you lay down the sod, not in the aftermath. Not providing enough water is one of the biggest reasons for the lawn failing and over-watering is a very close second. Rule of thumb, water at least twice a day along with watering during the afternoon. Keep the soil moist at a depth of 1 to 2 inches.

That said, check to ensure the soil will not stay saturated for long periods of time or the soil might not root. Reduce watering to every second or third day once the soil starts rooting which is around 2 weeks. After 4 weeks, the lawn can survive for longer periods of time without water.

NOTE – do not fertilize your new lawn for approximately 6 weeks then it's recommended you follow up by fertilizing with 1/2 pound nitrogen per 1,000 square feet.